vue 的双向绑定、虚拟dom、diff算法等等面试常见问题你可能在几年前就学过了,其中有些人可能看过Vue的源码,了解过Vue是如何实现数据监听和数据绑定这些技术的。不过让从零开始实现一个 vue,你可以吗?
模板语法其实早就存在,在Vue发布之前就有了。Vue除了具备基本的模板编译功能外,新增了很多功能属性,比如数据集data、方法集methods、组件集components等等,当然还具备了数据的响应式功能,具备生命周期函数……
我想如果能够从编译功能开始逐步增加这些功能属性,是否可以体会到尤大当初开发Vue的心路历程?或者至少能够更加清楚的理解Vue源码吧。
==简易版Vue基本实现思路==
在这个背景下,我按照自己的理解决定从0开始,开发一个简版的Vue:Avue。
从类的创建开始
创建一个类,参数为对象options,里面是Vue的各种数据集。这里采用es6语法,出于兼容性考虑的话,可以使用babel做处理。
1
2
3
4
5
| class Avue {
constructor(options) {
}
}
|
具备数据集data、方法集methods和挂载el
1
2
3
4
5
6
7
8
9
10
11
| class Avue {
constructor(options) {
const { data,method, el } = options
this.data = data;
this.methods = methods;
this.el = el
}
}
|
具备一定编译功能
遵循单一职责原则,编译功能单独拿出来,创建编译类。这里的编译可以处理Mustache语法(双大括号)以及事件指令。
1
2
3
4
5
6
7
8
9
10
11
12
13
| class Avue {
constructor(options) {
const { data,methods, el } = options
this.data = data;
this.methods = methods;
this.el = el
new Compile(this)
}
}
|
编译类实现。编译类实现了对元素节点和文本节点处理,能够处理其上的Mustache语法和事件指令。
1
2
3
4
5
6
7
8
9
10
11
12
13
14
15
16
17
18
19
20
21
22
23
24
25
26
27
28
29
30
31
32
33
34
35
36
37
38
39
40
41
42
43
44
45
46
47
48
49
50
51
52
53
54
55
56
57
58
59
60
61
62
63
64
| class Compile {
constructor(vm) {
this.vm = vm
this.vm.el = document.querySelector(vm.el);
this.compile();
}
compile() {
this.replaceData(this.vm.el);
const documentFragment = this.nodeToFragment(this.vm.el)
this.vm.el.appendChild(documentFragment);
}
nodeToFragment(el) {
let fragment = document.createDocumentFragment();
let child;
while (child = el.firstChild) {
fragment.appendChild(child);
}
return fragment;
}
replaceData(frag) {
Array.from(frag.childNodes).forEach(node => {
let txt = node.textContent;
let reg = /\{\{(.*?)\}\}/g;
if (this.isTextNode(node) && reg.test(txt)) {
let replaceTxt = () => {
node.textContent = txt.replace(reg, (matched, placeholder) => {
return placeholder.split('.').reduce((val, key) => {
return val[key];
}, this.vm);
});
};
replaceTxt();
}
if (this.isElementNode(node)) {
Array.from(node.attributes).forEach(attr => {
if (attr.name.startsWith('@')) {
const eventName = attr.name.slice(1);
const methodName = attr.value;
if (methodName in this.vm.methods) {
node.addEventListener(eventName, this.vm.methods[methodName].bind(this.vm));
}
}
});
if (node.childNodes && node.childNodes.length) {
this.replaceData(node);
}
}
});
}
isElementNode(node) {
return node.nodeType == 1
}
isTextNode(node) {
return node.nodeType == 3
}
}
|
注意:这个时候使用Avue,访问data中数据时,需要使用this.data[attr]方式。如果要解决这个问题需要加一层代理,访问代理。在Avue中添加访问代理方法proxyKeys。
1
2
3
4
5
6
7
8
9
10
11
12
13
14
15
16
17
18
19
20
21
22
23
24
25
26
27
28
29
30
31
32
| class Avue {
constructor(options) {
const { data,methods, el } = options
this.data = data;
Object.keys(this.data).forEach(key => {
this.proxyKeys(key);
});
this.el = el
this.methods = methods;
new Compile(this)
}
proxyKeys(key) {
Object.defineProperty(this, key, {
enumerable: false,
configurable: true,
get: function proxyGetter() {
return this.data[key];
},
set: function proxySetter(newVal) {
this.data[key] = newVal;
}
});
}
}
|
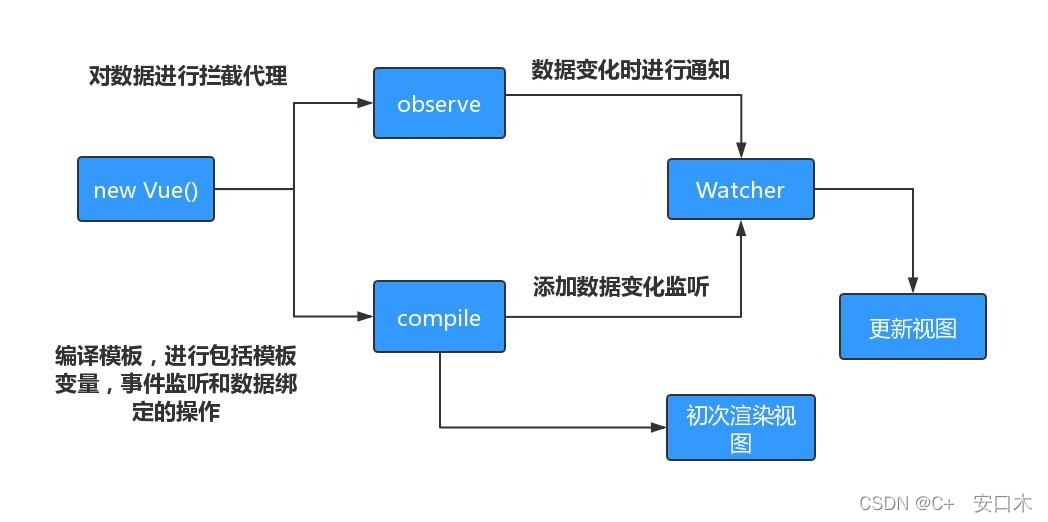
具备数据的响应式功能
增加Dep类:用于实现订阅发布模式,订阅Watcher对象,发布Watcher对象
增加Observe类:对数据集data数据进行拦截,在拦截过程中,get保存或订阅Watcher对象,set触发或者发布的Watcher对象
增加observe方法:用于对对象数据深层级进行拦截处理
增加Watcher类:用于触发Observe类数据拦截操作,然后以Dep.target为媒介,将当前Watcher对象保存到Dep对象中
总结:通过Observe类实现了对数据集的拦截,创建Watcher时触发get方法,此时Dep类订阅Watcher;设置数据集数据时,触发set方法,此时Dep类发布Watcher,触发update方法,触发回调函数,触发更新
1
2
3
4
5
6
7
8
9
10
11
12
13
14
15
16
17
18
19
20
21
22
23
24
25
26
27
28
29
30
31
32
33
34
35
36
37
38
39
40
41
42
43
44
45
46
47
48
49
50
51
52
53
54
55
56
57
58
59
60
61
62
63
64
65
66
67
68
69
70
71
72
73
74
75
76
77
78
79
| class Avue {
constructor(options) {
...
this.data = options.data;
Object.keys(this.data).forEach(key => {
this.proxyKeys(key);
});
new Observe(this.data)
...
}
}
class Dep {
constructor() {
this.subs = [];
}
addSub(sub) {
this.subs.push(sub);
}
notify() {
this.subs.forEach(sub => sub.update());
}
}
class Watcher {
constructor(vm, exp, fn) {
this.fn = fn;
this.vm = vm;
this.exp = exp;
Dep.target = this;
let arr = exp.split('.');
let val = vm;
arr.forEach(key => {
val = val[key];
});
Dep.target = null;
}
update() {
let arr = this.exp.split('.');
let val = this.vm;
arr.forEach(key => {
val = val[key];
});
this.fn(val);
}
}
class Observe {
constructor(data) {
let dep = new Dep();
for (let key in data) {
let val = data[key];
observe(val);
Object.defineProperty(data, key, {
get() {
Dep.target && dep.addSub(Dep.target);
return val;
},
set(newVal) {
if (val === newVal) {
return;
}
val = newVal;
observe(newVal);
dep.notify();
}
});
}
}
}
function observe(data) {
if (!data || typeof data !== 'object') return;
return new Observe(data);
}
|
编译类Compile增加Watcher,更新函数作为Watcher对象的回调函数
1
2
3
4
5
6
7
8
9
10
11
12
13
14
15
16
17
18
19
20
21
22
23
24
25
26
27
28
29
30
31
32
33
34
35
36
37
| class Compile {
...
replaceData(frag) {
Array.from(frag.childNodes).forEach(node => {
let txt = node.textContent;
let reg = /\{\{(.*?)\}\}/g;
if (this.isTextNode(node) && reg.test(txt)) {
let replaceTxt = () => {
node.textContent = txt.replace(reg, (matched, placeholder) => {
new Watcher(this.vm, placeholder, replaceTxt);
return placeholder.split('.').reduce((val, key) => {
return val[key];
}, this.vm);
});
};
replaceTxt();
}
if (this.isElementNode(node)) {
Array.from(node.attributes).forEach(attr => {
if (attr.name.startsWith('@')) {
const eventName = attr.name.slice(1);
const methodName = attr.value;
if (methodName in this.vm.methods) {
node.addEventListener(eventName, this.vm.methods[methodName].bind(this.vm));
}
}
});
if (node.childNodes && node.childNodes.length) {
this.replaceData(node);
}
}
});
}
}
|
具备计算属性功能
Avue增加用于处理计算属性功能。
实际就是将计算属性数据集computed打平,将所有计算属性添加到Avue实例对象上,同时进行拦截。使用计算属性数据时,执行get方法,执行计算属性函数。这里只是实现了基本的计算属性功能。
打平操作也说明了Vue的计算属性computed和数据集data不能有同名属性。
1
2
3
4
5
6
7
8
9
10
11
12
13
14
| class Avue {
constructor(options) {
....
const { computed } = options
this.computed = computed;
Object.keys(this.computed).forEach(key => {
Object.defineProperty(this, key, {
get: () => {
return this.computed[key].call(this);
}
});
});
...
}
|
具备watch功能
Avue增加用以处理watch数据集的功能。
遍历watch集合,创建Watcher对象,实际就是前面的发布订阅模式。不同的是此时的回调函数是watch里面的方法。这里也只是实现了基本功能。
1
2
3
4
5
6
7
8
9
10
11
12
13
14
| class Avue {
constructor(options) {
...
const { watch } = options
this.watch = watch;
this.initWatch()
}
initWatch() {
for (let key in this.watch) {
new Watcher(this, key, this.watch[key]);
}
}
}
|
具备过滤器功能
增加过滤器功能。
过滤器功能就比较简单了,可以说是一种语法糖或者面向切面编程。需要拦截双大括号,判断是否有过滤器标识。然后在编译类更新内容函数replaceTxt里面添加部分代码。
1
2
3
4
5
6
7
8
9
10
11
12
13
14
15
16
17
18
19
20
21
22
23
24
25
26
27
28
29
30
31
32
33
34
35
36
| class Compile {
...
replaceData(frag) {
Array.from(frag.childNodes).forEach(node => {
let txt = node.textContent;
let reg = /\{\{(.*?)\}\}/g;
if (this.isTextNode(node) && reg.test(txt)) {
let replaceTxt = () => {
node.textContent = txt.replace(reg, (matched, placeholder) => {
let key = placeholder.split('|')[0].trim();
let filter = placeholder.split('|')[1];
if (filter) {
let filterFunc = this.vm.filters[filter.trim()];
if (filterFunc) {
new Watcher(this.vm, key, replaceTxt);
return filterFunc.call(this.vm, key.split('.').reduce((val, k) => {
return val[k];
}, this.vm));
}
} else {
new Watcher(this.vm, placeholder, replaceTxt);
return placeholder.split('.').reduce((val, key) => {
return val[key];
}, this.vm);
}
});
};
replaceTxt();
}
});
}
}
|
具备组件注册功能
遵循单一职责原则,增加组件类。
组件本质上就是一个特殊的Avue实例。这里参照Vue,在Avue中创建静态方法extend,用以生成创建组件的构造函数。
1
2
3
4
5
6
7
8
9
10
11
12
13
14
15
16
17
18
19
20
21
22
23
24
25
26
27
28
29
30
31
32
33
34
35
36
37
38
39
40
41
42
43
44
45
46
47
48
49
50
51
52
53
54
55
| class Avue {
constructor(options) {
this._init(options)
}
...
_init(options){
if(!options){
return
}
const { data, methods, el, computed, components, watch, filters, template } = options
this.data = data;
this.methods = methods;
this.computed = computed;
this.watch = watch;
this.filters = filters;
this.components =components;
this.template = template
this.el = el
Object.keys(this.data).forEach(key => {
this.proxyKeys(key);
});
this.computed && Object.keys(this.computed).forEach(key => {
Object.defineProperty(this, key, {
get: () => {
return this.computed[key].call(this);
}
});
});
new Observe(this.data)
this.initWatch()
new Compile(this);
}
static extend(options) {
const Super = this;
const Sub = (function (){
return function VueComponent() {
let instance = new Super(options);
Object.assign(this, instance);
}
})()
Sub.prototype = Object.create(Super.prototype);
Sub.prototype.constructor = Sub;
Sub.options = Object.assign({}, Super.options, options);
return Sub;
}
}
|
编译类Compile增加处理自定义组件功能。
着重说明一下,这里自定义组件使用的模板是template属性。
Avue本身没有使用template属性,而采用的是查询挂载el下面的dom结构。所以自定义组件的template需要单独处理。增加单独处理方法handleTemplate。然后replaceData方法里增加创建组件功能。
1
2
3
4
5
6
7
8
9
10
11
12
13
14
15
16
17
18
19
20
21
22
23
24
25
26
27
28
29
30
31
32
33
34
35
36
37
38
39
40
41
42
43
44
45
46
47
| class Compile {
constructor(vm) {
this.vm = vm
this.vm.el = this.handleTemplate(vm)
this.compile();
}
handleTemplate(vm){
if(vm.el && typeof vm.el === 'string') {
return document.querySelector(vm.el)
}
const div = document.createElement('div')
div.innerHTML = vm.template
return div.firstChild
}
...
replaceData(frag) {
Array.from(frag.childNodes).forEach(node => {
...
if (this.isElementNode(node)) {
...
let nodeName = node.nodeName.toLowerCase();
if (this.vm.components && this.vm.components[nodeName]) {
let ComponentConstructor = this.vm.components[nodeName];
let component = new ComponentConstructor();
node.parentNode.replaceChild(component.el, node);
}
if (node.childNodes && node.childNodes.length) {
this.replaceData(node);
}
}
});
}
isElementNode(node) {
return node.nodeType == 1
}
isTextNode(node) {
return node.nodeType == 3
}
}
|
组件注册功能给我的启发比较大。之前一直不理解为什么Vue可以做到局部更新。写了简版的Vue,明白组件实际是特殊的Vue实例,组件本身就有一套更新机制,组件本身就是局部更新。
具备Vuex功能
Vuex本质上Vue的实例属性,而且只能是Vue而不能是组件的,否则就不能全局使用了。将其独立出来,创建Store类。
1
2
3
4
5
6
7
8
9
10
11
12
13
14
15
16
| class Store {
constructor(options) {
this.state = options.state;
this.mutations = options.mutations;
this.actions = options.actions;
}
commit(type, payload) {
this.mutations[type](this.state, payload);
}
dispatch(type, payload) {
this.actions[type]({ commit: this.commit.bind(this), state: this.state }, payload);
}
}
|
使用时创建实例,作为Avue实例的参数。同时需要将store中的state数据加入Observe类中,让其具备响应式特性。
1
2
3
4
5
6
7
8
9
10
11
12
13
14
15
16
17
18
19
20
21
22
23
24
25
26
27
28
29
30
31
32
33
34
35
36
37
38
39
40
41
42
43
44
45
46
47
48
| let store = new Store({
state: {
count: 0
},
mutations: {
increment(state) {
state.count++;
}
},
actions: {
increment(context) {
context.commit('increment');
}
}
});
...
class Avue {
constructor(options) {
this._init(options)
}
_init(options){
if(!options){
return
}
const { data, methods, el, computed, components, watch, filters, template, store } = options
...
this.store = store
Object.keys(this.data).forEach(key => {
this.proxyKeys(key);
});
this.computed && Object.keys(this.computed).forEach(key => {
Object.defineProperty(this, key, {
get: () => {
return this.computed[key].call(this);
}
});
});
new Observe(this.data)
this.store && new Observe(this.store.state)
this.initWatch()
new Compile(this);
}
}
|
具备插件注册功能
Avue增加静态方法use,用于接收插件。实际就是运行插件里的install方法,将不同种类的插件加到Avue上,以原型的形式、静态数据形式或其他。
1
2
3
4
5
6
7
8
9
10
11
12
13
14
15
16
17
18
19
20
21
22
23
24
25
26
27
28
29
30
31
32
33
| class Avue {
constructor(options) {
this.plugins = [];
}
static use(plugin) {
plugin.install(this);
}
}
const MyPlugin = {
install(avue) {
avue.myGlobalMethod = function () {
console.log('This is a global method');
}
avue.prototype.$myMethod = function (methodOptions) {
}
}
}
new Avue({
el: '#app',
data: {
message: 'Hello Vue!'
}
});
Avue.use(MyPlugin);
|
具备生命周期函数
生命周期就简单了,生命周期是切面编程的体现。只需要在对应时机或者位置加上生命周期函数就可以了。
Avue类增加处理生命周期函数方法_callHook,以及Avue实例增加对应的生命周期方法beforeCreate和mounted。
1
2
3
4
5
6
7
8
9
10
11
12
13
14
15
16
17
18
19
20
21
| class Avue {
constructor(options) {
this._init(options)
}
_callHook(lifecycle) {
this.$options[lifecycle] && this.$options[lifecycle].call(this);
}
_init(options){
if(!options){
return
}
...
this._callHook('beforeCreate');
new Compile(this);
this._callHook('mounted')
}
}
|
编译类Compile增加created生命周期
1
2
3
4
5
6
7
8
| class Compile {
constructor(vm) {
...
this.compile();
this.vm._callHook('created');
}
}
|
测试用例和所有功能代码
测试用例
1
2
3
4
5
6
7
8
9
10
11
12
13
14
15
16
17
18
19
20
21
22
23
24
25
26
27
28
29
30
31
32
33
34
35
36
37
38
39
40
41
42
43
44
45
46
47
48
49
50
51
52
53
54
55
56
57
58
59
60
61
62
63
64
65
66
67
68
69
70
71
72
73
74
75
76
77
78
79
80
81
82
| let MyComponent = Avue.extend({
template: '<div>这是一个组件{{message}}</div>',
data:{
message: 'Hello, Component!'
}
})
let store = new Store({
state: {
count: 0
},
mutations: {
increment(state) {
state.count++;
}
},
actions: {
increment(context) {
context.commit('increment');
}
}
});
const avue = new Avue({
el: '#app',
store,
data: {
name: 'canf1oo'
},
components: {
'my-component': MyComponent
},
computed: {
computedName(){
return this.name + '我是计算属性'
}
},
filters: {
addAvue(val){
return val + 'Avue'
}
},
watch: {
name(){
console.log('测试室测试试试')
},
computedName(){
console.log('测试室测试试试12232323')
}
},
methods: {
clickMe() {
this.name = 'click me'
this.store.commit('increment');
this.$plugin()
}
},
beforeCreate() {
console.log('beforeCreate')
},
created() {
console.log('created')
},
mounted() {
console.log('mounted')
},
});
const MyPlugin = {
install(avue) {
avue.myGlobalMethod = function () {
console.log('This is a global method');
}
avue.prototype.$plugin = function (methodOptions) {
console.log('我是插件')
}
}
}
Avue.use(MyPlugin)
|
Avue测试模板
1
2
3
4
5
6
7
8
9
| <div id="app">
<button @click="clickMe">{{name}}</button>
<button @click="clickMe">{{name | addAvue}}</button>
<button>{{computedName}}</button>
<span>{{store.state.count}}</span>
<my-component></my-component>
</div>
|
代码地址:github
整体上没有路由功能,所以是一个静态的非单页面的简版Vue。距离真实的Vue还差很远,比如props,比如render函数,比如插槽,比如作用域插槽,比如vdom等等。感兴趣的可以继续添加。